Guides · Updated July 2026
How to Use Crutches: Complete Beginner's Guide (Fit, Walk, Stairs)
Disclosure: As an Amazon Associate we earn from qualifying purchases. Commissions never change our scores. Details.
Three things every new crutch user needs to know:
- Your weight goes through your hands, not your armpits. The underarm pads are for stability only.
- Correct height puts 15-20 degrees of bend in your elbows when you grip the handles.
- Whether your foot touches the ground depends on your weight-bearing status (NWB, TTWB, PWB, WBAT, or FWB). Your surgeon’s instructions decide this, not the crutch type.
Your weight goes through your hands, not your armpits. That single habit separates a safe first week from a painful one. This guide covers the rest: how to fit crutches, walk, handle stairs, and avoid the common mistakes, whether you are on underarm or forearm crutches.
In this guide:
- Fit them before you take a step
- How to adjust crutch height
- Standing up and getting balanced
- The basic walk
- Sitting down
- Stairs
- Getting in and out of a car on crutches
- Navigating ramps, curbs, and outdoor terrain
- How to carry things while on crutches
- Forearm crutch walking technique
- Common mistakes in the first week
- Protecting your hands
- Finding the right pair
Free guide
Get the first-week on-crutches checklist: what to do days 1-7
How to set crutches up for the first week, what to check before you rely on them, and what changes as you progress. Free. Unsubscribe anytime.
Fit them before you take a step
Bad fit causes most crutch pain. Get this right first.
Underarm (axillary) crutches:
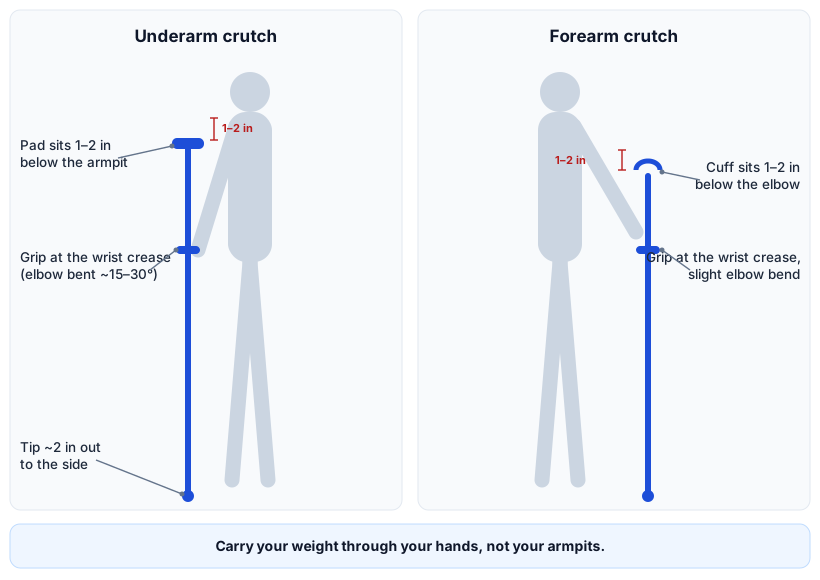
- The top pad sits 1–2 inches below your armpit when you stand straight in flat shoes.
- The handgrip lands at your wrist crease with a slight bend in the elbow (about 15–30 degrees).
- Correct pad height is the most important adjustment. Too high and the pad compresses nerves in your armpit.
Forearm (elbow) crutches:
- The cuff sits 1–2 inches below your elbow.
- The handgrip lands at your wrist crease. See how to size forearm crutches for the full measurement method.
The single most important habit: carry your weight through your hands, not your armpits. The underarm pads are for stability, not for weight. Leaning on them pinches the nerves there and causes numbness in your hands.
How to adjust crutch height
Both crutch types use push-button or twist-lock height adjusters on the shaft:
- Stand in the shoes you will wear most.
- Set the overall length first (for underarm crutches, pad height; for forearm crutches, shaft length).
- Adjust the handgrip height separately until your elbow has that slight bend.
- Lock both adjusters and give them a firm tug to confirm they are seated.
If you are between positions on the height scale, use the lower one. A crutch that is slightly too short is easier to control than one that is too tall. Our how to adjust crutches guide walks through the height and handgrip setup for both underarm and forearm crutches.
While you have the crutches in hand, glance at the rubber tips: smooth or cracked tips slip on hard floors, and replacing worn crutch tips takes a couple of minutes with no tools.
Standing up and getting balanced
Push up from the chair with your good leg and one hand on the armrest, holding both crutches in your other hand. Once standing, place a crutch under each arm and find your balance before moving. Do not rush the first few steps.
The basic walk
- Move both crutch tips forward together, about one comfortable stride ahead, just outside shoulder width.
- Shift your weight onto the grips through your hands; elbows bent, not locked.
- Swing your good leg forward so the foot lands between or just past the crutch tips.
- Transfer your weight back to your good leg and repeat.
- Look ahead, not at your feet. A steady rhythm comes quickly.
How much weight goes on the injured leg depends on your surgeon’s instructions. Follow your weight-bearing status exactly, that determines your technique, not the crutch type. The crutch gait patterns guide explains which gait (swing-through, three-point and others) goes with each status, and how to walk with crutches covers turns, curbs and pace once the basic step feels steady.
Quick quiz
Ready to find a better pair?
Tell us about your situation and we'll match you to the right type and pair — underarm, forearm, or something more specialized.
Sitting down
Back up until you feel the chair edge against your good leg. Move both crutches to one hand. Reach back and grip the armrest or seat with your free hand, then lower yourself slowly using your good leg. Keep the injured leg slightly forward, not tucked under the chair.
Stairs
Stairs cause the most crutch falls. Read how to use crutches on stairs before you try them. The short version:
- Going up: good leg leads, then crutches and injured leg follow to the same step.
- Going down: crutches and injured leg lead, then good leg follows.
- Memory cue: “good leg goes to heaven, injured leg goes down first.”
- Use the handrail whenever one is available, and hold both crutches in one hand on the rail side.
Getting in and out of a car on crutches
Car transfers are one of the more common real-world challenges in early recovery. The technique differs by which side you are using.
Passenger side: Approach the open door with both crutches. Back up until you feel the seat edge behind you, then sit first. Once seated, swing both legs in together. To exit, swing both legs out so both feet reach the floor, then plant both crutch tips on the ground before you push up through the grips to standing. The tip contacts the ground before you shift your weight onto it.
Driver side: Exit by opening the door and swinging your legs out first, then reach for the crutches and push to standing. Entry reverses: sit down first, then swing both legs in.
Vehicle height: Low sedans and bucket seats sit close to the ground, which means a deeper drop and more effort to push back up. SUVs and trucks with a higher seat are easier to manage: less distance to lower, less force to stand. If you have a choice of vehicles during recovery, the higher seat height is simpler to work with.
Navigating ramps, curbs, and outdoor terrain
Outdoor surfaces require shorter strides and more deliberate crutch placement than flat indoor floors.
Wet or slippery surfaces: Keep both crutch tips pointing straight down, perpendicular to the direction of travel, not angled forward. Shorter strides keep your center of gravity over your base. On visibly wet pavement, test the first step before committing your weight.
Slopes and ramps: Lean your body slightly toward the uphill side. Shorten your stride length and slow your rhythm. On the way up, press firmly through both grips before advancing. On the way down, advance the crutches one short step at a time and step your good leg forward to meet them.
Standard curbs: Approach head-on rather than at an angle. Going up, step with your good leg first, then bring the crutches and injured leg up. Going down, advance the crutches off the curb first, lower the injured leg, then follow with your good leg.
No handrail available: Keep one crutch under each arm for full stability. Go one move at a time and confirm both tips are planted flat before shifting weight onto them.
How to carry things while on crutches
Both hands are on the crutch grips when you are moving, which means carrying anything requires planning.
Backpack: A backpack worn on your back is the most practical option. It keeps both hands free for the grips and the load sits behind you, away from your forward balance point.
Fanny pack or belt bag: A waist bag at hip height carries small essentials: phone, keys, wallet. It fits without adding bulk at the front of your body.
Crutch bag attachments: Crutch bags that clip to the shaft keep frequently needed items within reach without requiring you to set the crutches down. Look for one that attaches below the handgrip and does not interfere with your grip position.
What not to do: Carrying anything in your hand blocks your grip on the handle. Even a light object changes how you load the grip and can cause the crutch to shift unexpectedly. Keep both hands on the crutches while you are moving.
Forearm crutch walking technique
Forearm crutches use the same swing-through gait as underarm crutches, but a few details work differently.
Gait pattern: Advance both crutches, transfer your weight through the grips, then step your good leg forward. The difference from axillary crutches is that more load-transfer runs through your wrist and forearm, so grip position matters more. Keep the wrist in a straight line with your forearm, not bent back.
The cuff release: The forearm cuff wraps around your arm, but most designs are open-sided or hinged so the arm slides free if you fall. This is a safety feature: the cuff stays in place during normal walking and releases under the sideways force of a fall, so you are not attached to the frame if you go down.
Strength and adaptation: Forearm crutches engage your wrist, forearm, and core more than axillary crutches in the first few days. This levels out as your body adapts to the technique. If your wrists feel strained early on, check your grip position: elbow slightly bent, wrist neutral, weight distributed through the palm rather than the fingers.
For the full technique walkthrough, see how to walk with forearm crutches.
Common mistakes in the first week
- Leaning on the armpit pads. Weight goes through your hands. The pads just prevent the crutch from sliding sideways.
- Tips too far forward. Placing crutches too far ahead makes them slip and throws your balance. One stride is enough.
- Looking down. It feels safer but actually destabilizes you. Look forward.
- Rushing. Slow is smooth on crutches, especially on uneven surfaces.
Free guide
Get the crutch setup checklist
First-week tips on fit, gait, and getting around — straight to your inbox.
Protecting your hands
Long recoveries on standard crutches can leave your hands and wrists sore. Gel or foam grip covers spread the load. If hand discomfort is the main issue, forearm crutches with ergonomic handles keep the wrist closer to neutral, see crutches that don’t hurt your hands.
Finding the right pair
The right crutch depends on your injury, your recovery length, and your body. The callout near the top is our highest-scored pick for longer recoveries, scored on comfort, durability, and the things that matter when you are on crutches for weeks. Take the quiz for a matched recommendation, or see the forearm vs. underarm comparison if you are still deciding which type fits your situation. Picking between a basic pair and a premium one often comes down to the frame material too, our wood vs. aluminum crutches breakdown covers the weight, adjustment, and capacity tradeoffs. When you are ready to choose, see our best crutches roundup for the top picks across every type, or best crutches for long-term use if you will be on them daily.
If you were handed a standard underarm pair, how to use underarm crutches covers keeping your weight on the grips instead of the pads. To keep the rest of your body moving while you heal, see exercises on crutches.
This is general information, not medical advice. Your physical therapist or surgeon’s weight-bearing instructions and technique guidance take precedence over anything on this page. Ask them to check your form.
Free guide
Get the crutch setup checklist
First-week tips on fit, gait, and getting around — straight to your inbox.
Not sure which crutch fits your recovery?
Take the 2-minute quizFrequently asked questions
How do you correctly use crutches?
Fit the crutches so the handgrip lands at your wrist crease with a slight elbow bend. Carry your weight through your hands, not your armpits. Move both crutch tips one stride ahead, shift your weight onto the grips, then swing your good leg forward. Look ahead, not at your feet, and keep a steady rhythm.
How do you adjust crutch height?
For underarm (axillary) crutches, stand tall and adjust the overall height until the top pad sits 1–2 inches below your armpit, then set the handgrip so your elbow bends about 15–30 degrees when you grip it. For forearm (elbow) crutches, adjust the shaft so the cuff sits 1–2 inches below your elbow and the handgrip meets your wrist crease. Both adjustments affect each other, so check the handgrip position after setting the length.
What is the correct way to walk with crutches?
Move both crutch tips forward together about one normal stride length. Shift your body weight onto the grips through your hands and slightly bend your elbows, but do not lock them. Swing or step your good leg forward to land between or just past the crutch tips. Lift your weight back onto your good leg and repeat. Keep your head up and look forward.
How should crutches fit under your arm?
The top pad on an underarm crutch should clear your armpit by 1–2 inches when you stand straight. If the pad is jammed into your armpit, the crutch is too tall and will compress nerves. The handgrip sets your functional weight: it should fall at your wrist crease with your arm hanging naturally, and when gripping, your elbow should have a slight bend.
How do you go up and down stairs on crutches?
Going up: step up with your good leg first, then bring your crutches and injured leg up to the same step. Going down: lead with both crutches and your injured leg stepping down first, then follow with your good leg. The memory cue is 'good leg goes to heaven, bad leg goes to hell.' Use the handrail when available and hold both crutches in one hand on the handrail side.
What does weight-bearing status mean when using crutches?
Your weight-bearing status is the instruction from your surgeon for how much weight you may place on the injured leg. Non-weight-bearing (NWB) means no weight at all; toe-touch (TTWB) means the foot may rest down for balance but carries almost none; partial (PWB) means a specific limited amount. Follow your surgeon's instructions exactly. Your weight-bearing status determines how you use crutches, not the crutch type.
How do you get in a car with crutches?
For the passenger side, back up to the open door with both crutches, sit first, then swing both legs in together. To exit, swing both legs out so both feet reach the floor, plant both crutch tips on the ground, then push up through the grips to standing. On the driver side, exit by swinging legs out first, then stand with crutch support. Higher vehicles such as SUVs and trucks are easier than low sedans because the seat is closer to standing height.
How do you carry things when using crutches?
A backpack is the most practical option because it keeps both hands free for the grips. A fanny pack or belt bag works for small items like keys or a phone. Crutch bag attachments that clip to the shaft are a third option. Avoid carrying anything in your hand: it blocks your grip on the handle and creates a fall risk.
Sources
- How to Use Crutches, Canes, and Walkers — OrthoInfo, American Academy of Orthopaedic Surgeons (AAOS)
- Using crutches — MedlinePlus, U.S. National Library of Medicine (NIH)
Free guide
Get the crutch setup checklist
First-week tips on fit, gait, and getting around — straight to your inbox.